
JPL.mp3
the iPod endgame does not exist.
Digital music players have a distinct appeal. Put simply, a combination of tactility, portability, and security combine to create a listening experience which, in my opinion, is fundamentally better than listening via a streaming service.
For a long time, the iPod was my digital music player of choice. But intrinsic to the line of devices is their age, limitations, and cost, all of which make modifications expensive and limited in scope. The solution? Building my own digital music play from scratch.
The JPL.mp3 was born out of a desire to have a functional and reliable digital music player which I could use on a daily basis but also meets modern performance, connectivity, capacity, etc. standards. I've also implemented a custom organization paradigm centered around classical music implemented through a custom database.
/* technical overview */
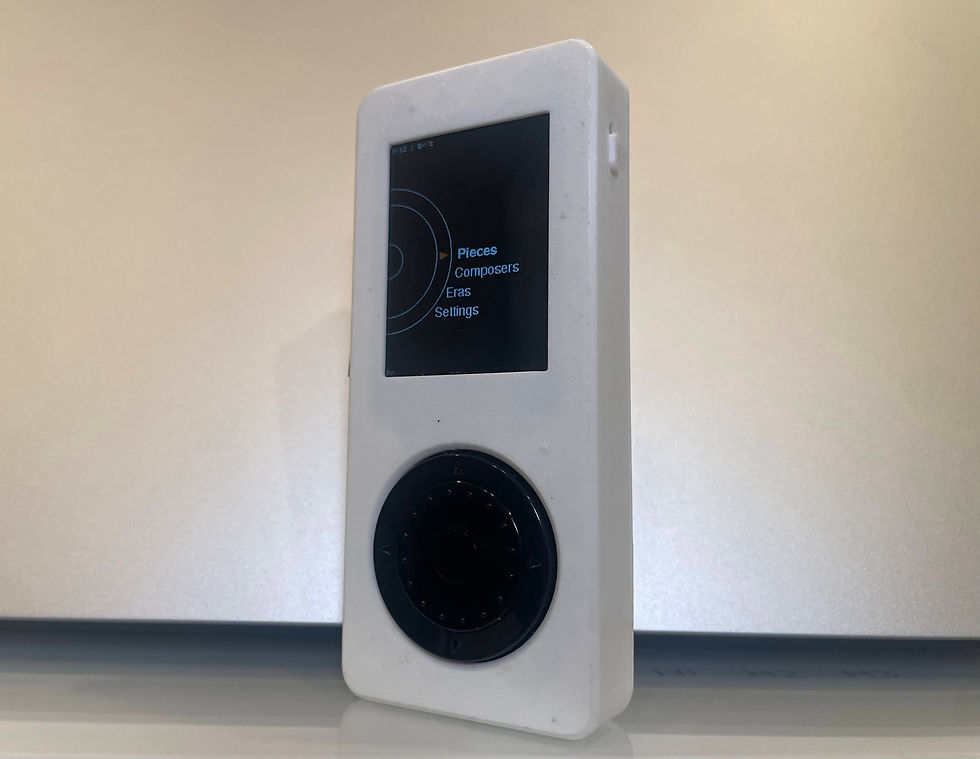
This project is based around ESP32-S3, which has advance compute and IO capabilities, while also being widely supported and thoroughly documented. I've implemented the PCM5102 I2S DAC for audio, MAX1811 BMS for power, and a microSD card for storage. Meanwhile, an IPS LCD display renders graphics, and a (very fun) mechanical clickwheel takes user input. These components, along with 0603 passives, came together on a four-layer rigid PCB, manufactured by PCBWay.
After prototyping in the ArduinoIDE, I took a leap of faith and migrated to the PlatformIO development environment. It ended up being an amazing choice, as it made development much easier and more flexible. That being said, I stayed in the Arduino development framework, allowing me to leverage myriad tried and true libraries. Most of it is standard (although poorly implemented - I barely knew how to write code, let alone organize an object oriented architecture when writing it) except for my organization/database paradigm.
Because I love classical music and planned to primarily listen to it via this device, I decided to implement my own organization database which optimizes for it. Using SQLite, I was able to create a simple database which allows for organization by Composer/Piece as opposed to Artist/Album/Song, while also allowing for alternative parameters such as conductor, orchestra, performer, era, etc..
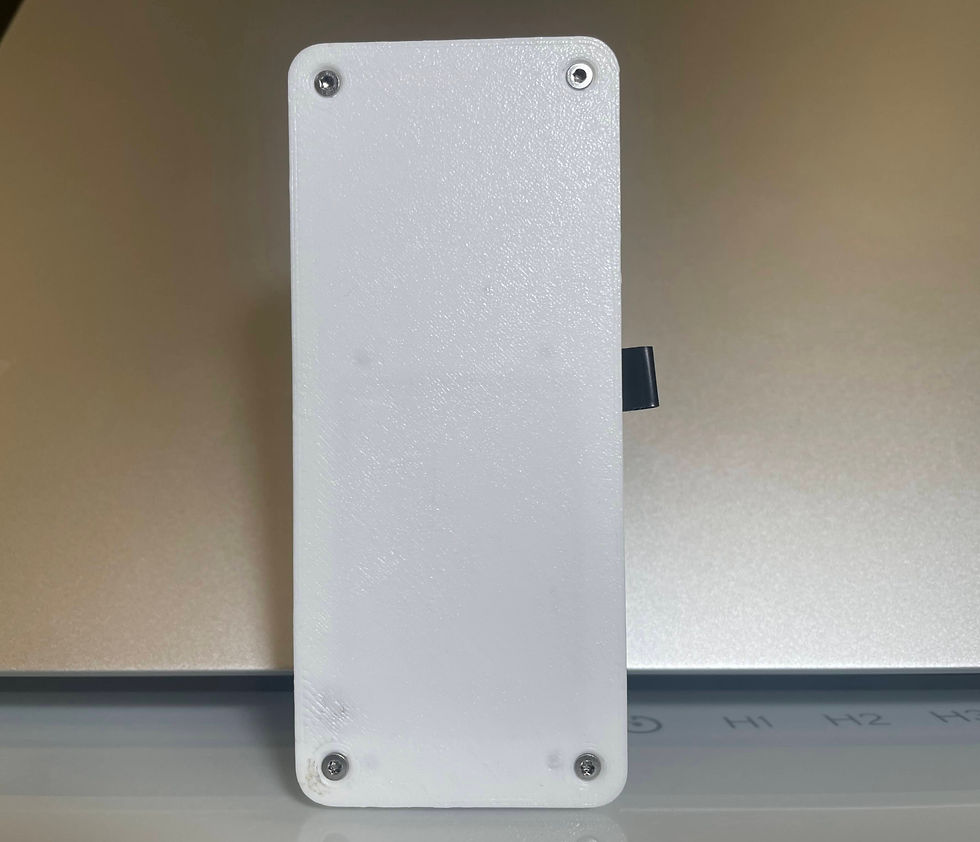
Although I originally had grand ambitions for the enclosure, the device's body nevertheless ended up a collection of 3D printed pieces. All components slot into the front plate, while the battery is held onto the back plate with clips, and 14 mm machine screws tie the two together, sandwiching the PCB between the two (and screws are secured into threaded inserts, of course:).
The end result is a chunky, but nevertheless functional digital music player, vaguely reminiscent of classic iPods, yet subtly modern. The clickwheel and headphone jack clash with the USB-C port and layer lines to create something uniquely contemporary - but still inspired by classic technology.
I also committed to developing all aspects of the device in Free and Open Source Software. Although this was at times painful, it was a valuable experience - with the added benefit that all source files are hyperaccessible.
/* development */
I chuckle to myself when I look back at my original development timeline for the device. 8 weeks, I told myself, is all I'll need. When I finally finished the project more than 52 weeks later, it seemed ludicrous that I could finish the whole thing in just two months.
I started by ideating on legal pad and in notebooks, outlining a concept design and desired functionality. Then, I shopped on Adafruit to collect components which I thought would work for the project without too much due diligence. (spoiler - they didn't).
With a ESP32 feather and trusty VS1053 feather wing in hand, I set off to make the device which would hopefully beat the dead horse which the iPod already is. But I soon pivoted to the Arduino UNO to prototype with the VS1053 given library troubles on the ESP, before ditching the VS chipset altogether after realizing availability would be a major hurdle. The final architecture came together shortly thereafter when I settled on using the ESP for decoding audio, and a DAC for outputting audio. After a few months, I had a working prototype on a breadboard, and was knee deep in firmware.
By far the most time consuming aspect of the project was the circuit board and schematic. It took three major revisions and countless hours over six months to finally get something that worked. This was the time when the project was closest to stalling, and also when I had to work hardest to move on from an alluring but unnecessary fourth revision. The first revision of the board didn't work at all, with only the BMS circuit being auditable. The second revision was a major leap, with display and SOC circuitry allowing for boot, but a persistent and elusive problem with the DAC meant it wasn't quite done. I swapped the sketchy exclusively-Mandarin-datasheet DAC for a more reputable Texas Instruments chip, ultimately solving the headache and teaching a valuable lesson in risk and time management.
In the home stretch and carrying the momentum of finishing the electronics, the enclosure design (unfortunately) became somewhat of an afterthought. Dredging through FreeCAD idiosyncrasies and bugs and dozens of test prints, I was left with a final design after a few months of iteration.
And after some final firmware tweaks, the project was done!
/* assembly */
[if you'd like to make one yourself, I highly recommend you download the source files and interact with them in KiCAD, FreeCAD, and VSCode to get a full grasp of how the device comes together. Please reach out if you'd like gerbers/3D print/BOM files directly.]
Before assembling anything, you'll need to fabricate some parts. I've published all requisite parts on the GitHub repo - but you'll need to interact with the design files to get the gerbers and 3D print files.
You'll need a few things for this build:
-
PCB (four-layer rigid 1 mm board)
-
Components (BOM derivable from schematic - mainly chips + 0603 passives)
-
3D printed parts (Frontplate, Backplate, Buttons, Switch Slide, Midplate, Battery clips)
-
Hardware (M2x14 and M1.4x2 bolts + accompanying threaded inserts)
-
Start by assembling the board. Hand soldering works but is error prone and tedious (I've done it a few times though), but a stencil or even preassembly are solid options.
-
Upon confirmation of successful assembly (sans magic smoke), flash the microcontroller using a USB-UART adapter and the cloned repo. [you'll need VSCode and PlatformIO for this]
-
Print the case. I used PLA with standard settings; anything should work. Place heat set inserts.
-
Place the screen into the frontplate. Screw the midplate in to hold it in place. Plug the screen's ribbon cable into the board, and align the board with the frontplate. Add the buttons and slider in now. Once everything is in place, secure the battery to the backplate, and press the backplate into place, securing it with the M2x14 bolts.
/* conclusion */
The JPL.mp3 has been my most complex and technically demanding project - but its also been my greatest opportunity for growth. I've learned firmware development, new software, and advanced PCB design - I've also internalized some more abstract lessons.
As alluded to in development, designing and debugging the PCB was the most time consuming and painful aspect of the whole project. But it taught me two key things.
First - test everything thoroughly. Sometimes, the most pervasive bug is in the place you least expect it. Be it a cold solder joint, typoed dimension, or misspelled variable, errors spare no mercy in cementing themselves in the simplest places.
Second - don't cut corners. While this may seem obvious, we often do it in ostensibly innocuous ways. For example, as I mentioned before, I initially opted for a super cheap no-name DAC which cost nearly nothing but apparently interfaced properly with minimal passives. That choice turned out to bite me later and cost me the most of any one single mistake in the project. The fundamental problem wasn't the chip - it was the lack of relevant documentation. As I later found out, the chipped worked, but needed an extra clock signal beyond what the DAC I used for prototyping did - a signal which clocked higher than the ESP itself. And worst of all, it took me ridiculously long to find that out because the datasheet was poorly translated, and no one on the internet had heard of it. So the choice I made - cutting the sunk cost and pivoting to a more reputable albeit more expensive and complex DAC - ended up saving me tons of time. Let me be clear: I'm not advocating to only use TI or MAX chips; rather, know what you're buying. Cheap chips can be great if they're properly documented and have a lot of users. Cheap chips that aren't, however, are more effort than they're worth.
An original goal of mine with this project was to make something that I could (and would) use every day. And while I hypothetically could, I don't. Why? Unfortunately, the device isn't 100% polished. Firmware bugs abound, and the power management situation remains...questionable. But in keeping it that way, I'm trying to practice the most important - and hardest - virtue in making - finishing projects. I could work on the JPL.mp3 for months, even years, longer. But would it be worth it? The true value in the project - the lessons learned along the way - has already been enjoyed; there is not much more to gain. So when I move on to my next project, I'll be able to apply my new skills and learn new lessons while building something novel.
I hope you've enjoyed this write-up and have been at least a bit inspired by it. Feel free to share any suggestions or comments!